Bradford on Avon: Difference between revisions
Jump to navigation
Jump to search
No edit summary |
No edit summary |
||
| (One intermediate revision by the same user not shown) | |||
| Line 1: | Line 1: | ||
'''To Bathampton Junction''': [[Bradford Viaduct]] | '''To Bathampton Junction''': [[Bradford Viaduct]] | ||
<br>'''To Bradford Junction''': [[St Margaret's Street]] | <br>'''To Bradford Junction''': [[St Margaret's Street]] | ||
| Line 17: | Line 12: | ||
Image:bradforonavon2.jpg|A general view of the station as viewed from the road bridge at its eastern end. | Image:bradforonavon2.jpg|A general view of the station as viewed from the road bridge at its eastern end. | ||
Image:bradforonavon3.jpg|The view east. The bridge in the photo carries [[St Margaret's Street]] across the railway, while just beyond is the 159 yard long [[Bradford Tunnel]]. | Image:bradforonavon3.jpg|The view east. The bridge in the photo carries [[St Margaret's Street]] across the railway, while just beyond is the 159 yard long [[Bradford Tunnel]]. | ||
</gallery> | |||
== 2007 == | == 2007 == | ||
<gallery> | <gallery> | ||
Latest revision as of 23:12, 14 April 2026
To Bathampton Junction: Bradford Viaduct
To Bradford Junction: St Margaret's Street
History
Track Plans
-
 A track plan of Bradford on Avon and surrounding area from 1988

2004
24.7.04
-
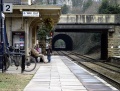
 A general view of the station as viewed from the road bridge at its eastern end.
 -
 The view east. The bridge in the photo carries St Margaret's Street across the railway, while just beyond is the 159 yard long Bradford Tunnel.


2007
-
 The view from the platforms towards the road bridge and tunnel. © John Rawlings
 -
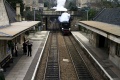 34067 Tangmere heads towards Bath with a special in February 2007. © John Rawlings


2008
15.1.08

