Wallgate Viaduct: Difference between revisions
Jump to navigation
Jump to search
New page: <div style="float:right"> <googlemap lat="51.741752" lon="-2.22147"> 51.743546, -2.222006, Wallgate Viaduct </googlemap> </div> '''To Dudbridge''': Emery Road<br> '''To Stroud Wallgate... |
No edit summary |
||
| (2 intermediate revisions by the same user not shown) | |||
| Line 1: | Line 1: | ||
'''To Dudbridge''': [[Emery Road]]<br> | '''To Dudbridge''': [[Emery Road]]<br> | ||
'''To Stroud Wallgate''': [[Stroud Wallgate]] | '''To Stroud Wallgate''': [[Stroud Wallgate]] | ||
| Line 9: | Line 4: | ||
12.2.09 | 12.2.09 | ||
<gallery> | <gallery> | ||
Image:Emery Road2.jpg|Four views of the northern side of the stranded viaduct. | |||
Image:Wallgate Viaduct1.jpg| | |||
Image:Wallgate Viaduct2.jpg| | |||
Image:Wallgate Viaduct3.jpg| | |||
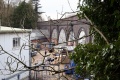
Image:Wallgate Viaduct5.jpg|A composite of two photos. | |||
Image:Wallgate Viaduct4.jpg|The other side of the viaduct. | |||
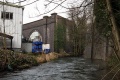
Image:Wallgate Viaduct6.jpg|There's a gap in the viaduct where the River Frome passes through. The stonework on the right hand side supports the A419 Dr Newton's Way bypass which covers the site of [[Stroud Wallgate]]. | |||
Image:Wallgate Viaduct7.jpg| | |||
</gallery> | </gallery> | ||
[[Category:Gloucester:Viaducts]] | [[Category:Gloucester:Viaducts]] | ||
[[Category:S&NR]] | [[Category:S&NR]] | ||
Latest revision as of 20:27, 12 April 2026
To Dudbridge: Emery Road
To Stroud Wallgate: Stroud Wallgate
Gallery
12.2.09
-
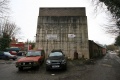 Four views of the northern side of the stranded viaduct.
 -
-

-

-
 A composite of two photos.
 -
 The other side of the viaduct.
 -
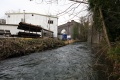 There's a gap in the viaduct where the River Frome passes through. The stonework on the right hand side supports the A419 Dr Newton's Way bypass which covers the site of Stroud Wallgate.
 -