Dudbridge: Difference between revisions
Jump to navigation
Jump to search
No edit summary |
No edit summary |
||
| (4 intermediate revisions by the same user not shown) | |||
| Line 1: | Line 1: | ||
'''To Stonehouse (Bristol Road)''': [[Ryeford]]<br> | '''To Stonehouse (Bristol Road)''': [[Ryeford]]<br> | ||
'''To Stroud Wallgate''': [[A46 Bath Road]]<br> | '''To Stroud Wallgate''': [[A46 Bath Road]]<br> | ||
'''To Nailsworth''': [[ | '''To Nailsworth''': [[Selsley Hill]] | ||
== Gallery == | == Gallery == | ||
1.10.11 | |||
<gallery> | <gallery> | ||
Image:Dudbridge1.jpg|The remains of Dudbridge station in 2011. This is the view towards [[Nailsworth]]. | |||
Image:Dudbridge2.jpg|The view towards [[Ryeford]]. The A419 cuts through the alignment of the railway, although the trackbed does survive on the other side of the roundabout. | |||
Image:Dudbridge3.jpg|The platforms still survive, although the trackbed between them has been filled in. One platform has two benches and a plaque. | |||
</gallery> | </gallery> | ||
[[Category:Gloucester:Stations:Closed]] | [[Category:Gloucester:Stations:Closed]] | ||
[[Category:S&NR]] | [[Category:S&NR]] | ||
Latest revision as of 20:23, 12 April 2026
To Stonehouse (Bristol Road): Ryeford
To Stroud Wallgate: A46 Bath Road
To Nailsworth: Selsley Hill
Gallery
1.10.11
-
 The remains of Dudbridge station in 2011. This is the view towards Nailsworth.
 -
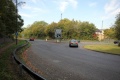 The view towards Ryeford. The A419 cuts through the alignment of the railway, although the trackbed does survive on the other side of the roundabout.
 -
 The platforms still survive, although the trackbed between them has been filled in. One platform has two benches and a plaque.


