Barrow Road: Difference between revisions
Jump to navigation
Jump to search
No edit summary |
|||
| (6 intermediate revisions by the same user not shown) | |||
| Line 1: | Line 1: | ||
'''To Temple Meads''': [[Barrow Road MPD]]<br> | '''To Temple Meads''': [[Barrow Road MPD]]<br> | ||
'''To Avon Wharf''': [[Bristol City Council Refuse Transfer Station]]<br> | '''To Avon Wharf''': [[Bristol City Council Refuse Transfer Station]]<br> | ||
| Line 13: | Line 8: | ||
<gallery> | <gallery> | ||
Image:Lawrence Hill Junction1.jpg|A view of [[Lawrence Hill Junction]] with '''Barrow Road''' behind. ''© [[:Category:David Gardner|David Gardner]] | Image:Lawrence Hill Junction1.jpg|A view of [[Lawrence Hill Junction]] with '''Barrow Road''' behind. ''© [[:Category:David Gardner|David Gardner]] | ||
</gallery> | |||
== 1980s == | |||
16.4.81 | |||
<gallery> | |||
Image:Barrow Road2.jpg|Barrow Road bridge stands while the railway system all around is demolished to make way for a trading estate. The bridge lasted another 10 years. The arch on the far right carried the [[:Category:MR|Midland Railway]] main line into [[Temple Meads]]. ''© [[:Category:Steven Dowle|Steven Dowle]]'' | |||
Image:Barrow Road5.jpg|An aerial view of the area showing Barrow Road leading to the large roundabout at Lawrence Hill. Also visible is the [[Bristol City Council Refuse Transfer Station]] and the branch to [[Avon Street]]. | |||
</gallery> | |||
== 1990s == | |||
<gallery> | |||
Image:Barrow Road3.jpg|[[56052]] Pulls forward underneath Barrow Road with a train from the [[Bristol City Council Refuse Transfer Station]]. This is the same view as in the [[Lawrence Hill Junction]] photo above. 27.4.92 ''© [[:Category:Dave Higson|Dave Higson]]'' | |||
Image:Barrow Road4.jpg|The same train viewed from the Barrow Road bridge. 27.4.92 ''© [[:Category:Dave Higson|Dave Higson]]'' | |||
</gallery> | </gallery> | ||
== 2004 == | == 2004 == | ||
<gallery> | <gallery> | ||
Image:Barrow Road1.jpg|The view towards what once was [[Lawrence Hill Junction]] taken from the new Barrow Road bridge. The [[A420 Lawrence Hill]] road crosses the railway in the background. | Image:Barrow Road1.jpg|The view towards what once was [[Lawrence Hill Junction]] taken from the new Barrow Road bridge. The [[A420 Lawrence Hill]] road crosses the railway in the background. | ||
</gallery> | |||
== 2006 == | |||
<gallery> | |||
Image:Busy Barrow Road.jpg|A panoramic view of the new road junction that replaced the old road bridge over the Midland Railway main line. | |||
</gallery> | </gallery> | ||
[[Category:Bridges]] | [[Category:Bridges]] | ||
[[Category:Bristol and Bath Railway Path]] | [[Category:Bristol and Bath Railway Path]] | ||
[[Category:Bristol & Gloucestershire Railway]] | [[Category:Bristol & Gloucestershire Railway]] | ||
[[Category:Steven Dowle]] | |||
[[Category:David Gardner]] | [[Category:David Gardner]] | ||
[[Category:Dave Higson]] | |||
[[Category:MR]] | [[Category:MR]] | ||
Latest revision as of 12:33, 12 July 2022
To Temple Meads: Barrow Road MPD
To Avon Wharf: Bristol City Council Refuse Transfer Station
To St Philips: St Philips
To Bath or the North : Lawrence Hill Junction
History
1960s
-
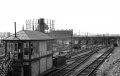 A view of Lawrence Hill Junction with Barrow Road behind. © David Gardner

1980s
16.4.81
-
 Barrow Road bridge stands while the railway system all around is demolished to make way for a trading estate. The bridge lasted another 10 years. The arch on the far right carried the Midland Railway main line into Temple Meads. © Steven Dowle
 -
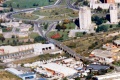 An aerial view of the area showing Barrow Road leading to the large roundabout at Lawrence Hill. Also visible is the Bristol City Council Refuse Transfer Station and the branch to Avon Street.


1990s
-
 56052 Pulls forward underneath Barrow Road with a train from the Bristol City Council Refuse Transfer Station. This is the same view as in the Lawrence Hill Junction photo above. 27.4.92 © Dave Higson
 -
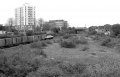 The same train viewed from the Barrow Road bridge. 27.4.92 © Dave Higson


2004
-
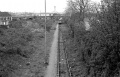
 The view towards what once was Lawrence Hill Junction taken from the new Barrow Road bridge. The A420 Lawrence Hill road crosses the railway in the background.

2006
-
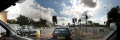 A panoramic view of the new road junction that replaced the old road bridge over the Midland Railway main line.