Nightingale Valley: Difference between revisions
Jump to navigation
Jump to search
No edit summary |
|||
| (2 intermediate revisions by the same user not shown) | |||
| Line 1: | Line 1: | ||
'''To Parson Street Junction''': [[Clifton Bridge No 1 Tunnel]]<br> | '''To Parson Street Junction''': [[Clifton Bridge No 1 Tunnel]]<br> | ||
'''To Portishead''': [[Stoneleigh Camp]] | '''To Portishead''': [[Stoneleigh Camp]] | ||
| Line 11: | Line 6: | ||
<gallery> | <gallery> | ||
Image:Nightingale Valley1.jpg|''© [[:Category:Stuart Jenkins|Stuart Jenkins]]'' | Image:Nightingale Valley1.jpg|''© [[:Category:Stuart Jenkins|Stuart Jenkins]]'' | ||
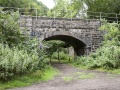
Image:Nightingale Valley2.jpg| | Image:Nightingale Valley2.jpg|The bridge viewed from Nightingale Valley. 18.5.08 | ||
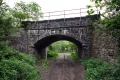
Image:Nightingale Valley3.jpg|A view of the bridge showing a cycle path running through the [[w:Avon Gorge|Avon Gorge]] alongside the railway. | Image:Nightingale Valley3.jpg|A view of the bridge showing a cycle path running through the [[w:Avon Gorge|Avon Gorge]] alongside the railway. | ||
Image:Nightingale Valley4.jpg| | |||
</gallery> | </gallery> | ||
[[Category:Bridges]] | [[Category:Bridges]] | ||
[[Category:B&PP&RC]] | [[Category:B&PP&RC]] | ||
[[Category:Stuart Jenkins]] | [[Category:Stuart Jenkins]] | ||
Latest revision as of 17:39, 2 August 2022
To Parson Street Junction: Clifton Bridge No 1 Tunnel
To Portishead: Stoneleigh Camp
History
Gallery
-
-
 The bridge viewed from Nightingale Valley. 18.5.08
 -
 A view of the bridge showing a cycle path running through the Avon Gorge alongside the railway.
 -