Cam Brook & Twinhoe Road Bridge: Difference between revisions
Jump to navigation
Jump to search
BristleGWR (talk | contribs) No edit summary |
BristleGWR (talk | contribs) No edit summary |
||
| Line 8: | Line 8: | ||
== History == | == History == | ||
== Gallery == | == Gallery == | ||
8th June | |||
<gallery> | <gallery> | ||
Image:Midford Viaduct1.jpg|The [[:Category:S&DJR|S&DJR]] viaduct makes a fine backdrop to the bridge carrying the [[:Category:GWR|GWR]] [[:Category:Camerton Branch|Camerton Branch]]. ''© [[:Category:John Rawlings|John Rawlings]]'' | Image:Midford Viaduct1.jpg|The [[:Category:S&DJR|S&DJR]] viaduct makes a fine backdrop to the bridge carrying the [[:Category:GWR|GWR]] [[:Category:Camerton Branch|Camerton Branch]]. ''© [[:Category:John Rawlings|John Rawlings]]'' | ||
Revision as of 19:34, 14 June 2008
<googlemap lat="51.343541" lon="-2.344927"> 51.343481, -2.344905, Cam Brook and Twinhoe Road Bridge </googlemap>
To Monkton Combe: Midford Viaduct (S&DJR)
To Hallatrow: Cam Brook Viaduct
History
Gallery
8th June
-
 The S&DJR viaduct makes a fine backdrop to the bridge carrying the GWR Camerton Branch. © John Rawlings

2008
-
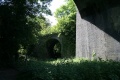 One of the arches of the bridge with Midford Viaduct towering above it. © Ian Tiley
 -
 The western abutment that used to support the steel span of the bridge that crossed the road to Twinhoe. © Ian Tiley

