Ocean Bridge: Difference between revisions
Jump to navigation
Jump to search
No edit summary |
No edit summary |
||
| Line 11: | Line 11: | ||
Image:OceanBridge2.jpg|Approaching the two bridges at Ocean Bridge. [[Temple Meads|Bristol]] is to the left, [[Gloucester]] to the right. | Image:OceanBridge2.jpg|Approaching the two bridges at Ocean Bridge. [[Temple Meads|Bristol]] is to the left, [[Gloucester]] to the right. | ||
Image:OceanBridge3.jpg|The pedestrian bridge. | Image:OceanBridge3.jpg|The pedestrian bridge. | ||
Image:OceanBridge4.jpg|The 'bridge' in which the Stroudwater Navigation canal passes. | Image:OceanBridge4.jpg|The 'bridge' in which the [[:Category:Stroudwater Navigation|Stroudwater Navigation]] canal passes. | ||
Image:OceanBridge5.jpg|The bridges viewed from the other side. | Image:OceanBridge5.jpg|The bridges viewed from the other side. | ||
Image:Ocean Bridge1.jpg|Under the railway with a disused canal basin visible through the arch. | Image:Ocean Bridge1.jpg|Under the railway with a disused canal basin visible through the arch. | ||
| Line 18: | Line 18: | ||
[[Category:B&GR]] | [[Category:B&GR]] | ||
[[Category:MR]] | [[Category:MR]] | ||
[[Category:Stroudwater Navigation]] | |||
Revision as of 17:15, 13 May 2010
<googlemap lat="51.742071" lon="-2.295198"> 51.744157, -2.295456, Ocean Bridge </googlemap>
To Yate: River Frome-Stonehouse
To the North: A419
Gallery
12.2.09
-
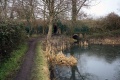 Approaching the two bridges at Ocean Bridge. Bristol is to the left, Gloucester to the right.
 -
 The pedestrian bridge.
 -
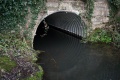 The 'bridge' in which the Stroudwater Navigation canal passes.
 -
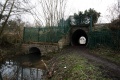 The bridges viewed from the other side.
 -
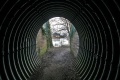 Under the railway with a disused canal basin visible through the arch.


