Wapping Road: Difference between revisions
Jump to navigation
Jump to search
No edit summary |
No edit summary |
||
| Line 14: | Line 14: | ||
Image:Wapping Road3.jpg|Doing a 180 gave this view along the back of the Industrial Museum. The sleeper-built fence on the left hides the site of the former coal concentration yard belonging to the [[Western Fuel Company Coal Concentration Depot|Western Fuel Co]]. This view is to be transformed with the shoe-horning of new housing into the area. | Image:Wapping Road3.jpg|Doing a 180 gave this view along the back of the Industrial Museum. The sleeper-built fence on the left hides the site of the former coal concentration yard belonging to the [[Western Fuel Company Coal Concentration Depot|Western Fuel Co]]. This view is to be transformed with the shoe-horning of new housing into the area. | ||
Image:Western Fuel1.jpg|The entrance to the site of the [[Western Fuel Company Coal Concentration Depot]]. The site was in use as a pay and display car park, while the Western Fuel Co. office block is boarded up and derelict. | Image:Western Fuel1.jpg|The entrance to the site of the [[Western Fuel Company Coal Concentration Depot]]. The site was in use as a pay and display car park, while the Western Fuel Co. office block is boarded up and derelict. | ||
</gallery> | |||
== 2009 == | |||
19.4.09 | |||
<gallery> | |||
Image:Wapping Road5.jpg|A view of the rails embedded into the surface of the road next to Prince Street Swingbridge. | |||
</gallery> | </gallery> | ||
[[Category:Bristol Harbour Railway]] | [[Category:Bristol Harbour Railway]] | ||
[[Category:Level Crossings]] | [[Category:Level Crossings]] | ||
Revision as of 16:16, 2 January 2013
<googlemap lat="51.440687" lon="-2.596035"> 51.447729, -2.596775, Wapping Road </googlemap>
To Temple Meads: Bathurst Basin
To the Docks: Princes Wharf
The Western Fuel Co.: Western Fuel Company Coal Concentration Depot
Gallery
4.2.06
-
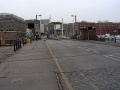 The rails were still embedded in Wapping Road many years after this part of the railway system closed to traffic. This was the view into Bristol city centre, with Princes Street swing bridge spanning the gap in the water. These rails served waterfront warehousing.
 -
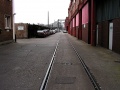
 Further along Wapping Road there was more buried rail visible, this time leading under housing that had been built on the site of former rail-served warehousing.
 -
 Doing a 180 gave this view along the back of the Industrial Museum. The sleeper-built fence on the left hides the site of the former coal concentration yard belonging to the Western Fuel Co. This view is to be transformed with the shoe-horning of new housing into the area.
 -
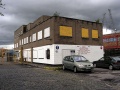 The entrance to the site of the Western Fuel Company Coal Concentration Depot. The site was in use as a pay and display car park, while the Western Fuel Co. office block is boarded up and derelict.


2009
19.4.09
-
 A view of the rails embedded into the surface of the road next to Prince Street Swingbridge.
