Feeder Road: Difference between revisions
Jump to navigation
Jump to search
No edit summary |
|||
| Line 10: | Line 10: | ||
<gallery> | <gallery> | ||
Image:Feeder Road1.jpg|A photo of the bridge across the Feeder sometime in the late 50s-60s. In this photo the bridge only has one span. ''© [[:Category:Clive Moore|Clive Moore]]'' | Image:Feeder Road1.jpg|A photo of the bridge across the Feeder sometime in the late 50s-60s. In this photo the bridge only has one span. ''© [[:Category:Clive Moore|Clive Moore]]'' | ||
Image:D7009-1.jpg|[[Class 35|Hymek]] [[D7009]] crosses the canal in the early 1970s. ''© [[:Category:Andy Kirkham|Andy Kirkham]]'' | |||
Image:Feeder Road2.jpg|The same view on the 8.8.04. Both the road and the railway have been widened. A canal boat chugs gently under the railway. | Image:Feeder Road2.jpg|The same view on the 8.8.04. Both the road and the railway have been widened. A canal boat chugs gently under the railway. | ||
Image:Feeder Road3.jpg|The various structures viewed from the other side. | Image:Feeder Road3.jpg|The various structures viewed from the other side. | ||
| Line 17: | Line 18: | ||
[[Category:Bridges]] | [[Category:Bridges]] | ||
[[Category:GWR]] | [[Category:GWR]] | ||
[[Category:Andy Kirkham]] | |||
[[Category:Clive Moore]] | [[Category:Clive Moore]] | ||
Revision as of 20:38, 9 September 2008
<googlemap lat="51.452028" lon="-2.564878"> 51.450958, -2.565157, Feeder Road </googlemap>
To Temple Meads: St Philips Causeway
To the North or Wales: Rhubarb Loop
To Bath:North Somerset Junction & Feeder Junction
Gallery
-
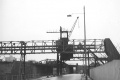 A photo of the bridge across the Feeder sometime in the late 50s-60s. In this photo the bridge only has one span. © Clive Moore
 -

-
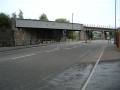 The same view on the 8.8.04. Both the road and the railway have been widened. A canal boat chugs gently under the railway.
 -
 The various structures viewed from the other side.
 -
 The railway continues past the Feeder Road on a much-strengthened viaduct.
 -
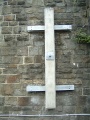 A close up of one of the bearers.


