Bathurst Basin: Difference between revisions
Jump to navigation
Jump to search
No edit summary |
No edit summary |
||
| Line 10: | Line 10: | ||
Image:Floating Harbour 1902.jpg|A track plan of the Floating Harbour area of Bristol from [[1902]]. | Image:Floating Harbour 1902.jpg|A track plan of the Floating Harbour area of Bristol from [[1902]]. | ||
</gallery> | </gallery> | ||
<gallery> | |||
Image:Bathurst Wharf1.jpg|A 1970s view of Bathurst Wharf. St Mary Redcliffe Church is visible behind the cranes. ''© [[:Category:Emmdee|Emmdee]]'' | |||
Image:Wapping Road1.jpg|The rails were still embedded in Wapping Road many years after this part of the railway system closed to traffic. This was the view into Bristol city centre, with Princes Street swing bridge spanning the gap in the water. | |||
</gallery> | |||
[[Category:Bridges:Demolished]] | [[Category:Bridges:Demolished]] | ||
[[Category:Emmdee]] | |||
[[Category:Bristol Harbour Railway]] | [[Category:Bristol Harbour Railway]] | ||
[[category:Locations Needing Images]] | [[category:Locations Needing Images]] | ||
Revision as of 18:33, 10 March 2010
<googlemap lat="51.440099" lon="-2.593718"> 51.447635, -2.594361, Bathurst Basin </googlemap>
To Temple Meads: Redcliffe Tunnel
To the Docks: Wapping Road
Track Plans
-
 A track plan of the Floating Harbour area of Bristol from 1902.

-
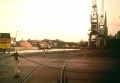 A 1970s view of Bathurst Wharf. St Mary Redcliffe Church is visible behind the cranes. © Emmdee
 -
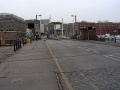 The rails were still embedded in Wapping Road many years after this part of the railway system closed to traffic. This was the view into Bristol city centre, with Princes Street swing bridge spanning the gap in the water.

