Bathurst Basin: Difference between revisions
Jump to navigation
Jump to search
No edit summary |
No edit summary |
||
| Line 12: | Line 12: | ||
<gallery> | <gallery> | ||
Image:Bathurst Wharf1.jpg|A 1970s view of Bathurst Wharf. St Mary Redcliffe Church is visible behind the cranes. ''© [[:Category:Emmdee|Emmdee]]'' | Image:Bathurst Wharf1.jpg|A 1970s view of Bathurst Wharf. St Mary Redcliffe Church is visible behind the cranes. ''© [[:Category:Emmdee|Emmdee]]'' | ||
Image: | Image:Bathurst Wharf2.jpg|A view of the land to the south of Bathurst Wharf with [[Redcliffe Tunnel]] visible in the distance. ''© [[:Category:Emmdee|Emmdee]]'' | ||
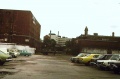
Image:Bathurst Wharf3.jpg|Further south (opposite the [[Western Fuel Company Coal Concentration Depot]] stood warehousing protected by level crossing gates. ''© [[:Category:Emmdee|Emmdee]]'' | |||
</gallery> | </gallery> | ||
[[Category:Bridges:Demolished]] | [[Category:Bridges:Demolished]] | ||
[[Category:Emmdee]] | [[Category:Emmdee]] | ||
[[Category:Bristol Harbour Railway]] | [[Category:Bristol Harbour Railway]] | ||
Latest revision as of 17:40, 10 March 2010
<googlemap lat="51.440099" lon="-2.593718"> 51.447635, -2.594361, Bathurst Basin </googlemap>
To Temple Meads: Redcliffe Tunnel
To the Docks: Wapping Road
Track Plans
-
 A track plan of the Floating Harbour area of Bristol from 1902.

-
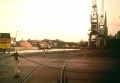 A 1970s view of Bathurst Wharf. St Mary Redcliffe Church is visible behind the cranes. © Emmdee
 -
 A view of the land to the south of Bathurst Wharf with Redcliffe Tunnel visible in the distance. © Emmdee
 -
 Further south (opposite the Western Fuel Company Coal Concentration Depot stood warehousing protected by level crossing gates. © Emmdee


