Parson Street: Difference between revisions
Jump to navigation
Jump to search
| Line 15: | Line 15: | ||
== 2004 == | == 2004 == | ||
<gallery> | <gallery> | ||
Image:Parson Street2.jpg|The view from Parson Street | Image:Parson Street2.jpg|The view from Parson Street road bridge towards the footbridge at [[Malago Vale Carriage Sidings|Malago Vale]]. The new-build houses on the site of the old carriage sidings are protected from noise from the railway by a big wall. | ||
Image:Parson Street1.jpg|A general view along | Image:Parson Street1.jpg|A general view along the station. | ||
Image:Parson Street3.jpg| | Image:Parson Street3.jpg|Under the road bridge. | ||
Image:Parson Street16.jpg|The view from the | Image:Parson Street16.jpg|The view from the down platform with [[150261]] disappearing under [[Malago Vale Carriage Sidings|Bartletts Bridge]]. | ||
Image:Parson Street4.jpg|This electrical cabinet is underneath the stairway on the | Image:Parson Street4.jpg|This electrical cabinet is underneath the stairway on the up platform. | ||
Image:Parson Street5.jpg|The footbridge has seen better times. Like a lot of the bridges in Bristol it once had a roof | Image:Parson Street5.jpg|The footbridge has seen better times. Like a lot of the bridges in Bristol it once had a roof. | ||
Image:Parson Street6.jpg|This signal protects the junction between the loop and the mainline. | Image:Parson Street6.jpg|This signal protects the junction between the loop and the mainline. | ||
Image:Parson Street7.jpg|Looking along the | Image:Parson Street7.jpg|Looking along the up slow/freight line. This line leads to the Portishead Branch. | ||
Image:Parson Street15.jpg|And looking along the scar of the | Image:Parson Street15.jpg|And looking along the scar of the down slow. | ||
Image:Parson Street17.jpg|This electrical cabinet stands in the trackbed of the | Image:Parson Street17.jpg|This electrical cabinet stands in the trackbed of the down slow. | ||
Image:Parson Street8.jpg|A view of one of the platform shelters. | Image:Parson Street8.jpg|A view of one of the platform shelters. | ||
Image:Parson Street14.jpg|The other platform shelter is a different (older) design. | Image:Parson Street14.jpg|The other platform shelter is a different (older) design. | ||
Image:Parson Street9.jpg|The platform ends are fenced off part way along | Image:Parson Street9.jpg|The platform ends are fenced off part way along. | ||
Image:Parson Street10.jpg|A view of the bridge that carries [[Bedminster Down Road]] across the line. On the right is an abutment from another bridge that used to cross here | Image:Parson Street10.jpg|A view of the bridge that carries [[Bedminster Down Road]] across the line. On the right is an abutment from another bridge that used to cross here. | ||
Image:Parson Street11.jpg|A close up of the abutment. | Image:Parson Street11.jpg|A close up of the abutment. | ||
Image:Parson Street13.jpg|A view back along the platforms, looking towards Bristol. | Image:Parson Street13.jpg|A view back along the platforms, looking towards Bristol. | ||
Image:Parson Street18.jpg|The view back along the station from the | Image:Parson Street18.jpg|The view back along the station from the down platform. | ||
</gallery> | </gallery> | ||
[[Category:GWR]] | [[Category:GWR]] | ||
[[Category:Stations]] | [[Category:Stations]] | ||
Revision as of 20:40, 9 February 2008
<googlemap lat="51.433197" lon="-2.608008"> 51.433317, -2.607837, Parson Street </googlemap>
To Bristol: Malago Vale Carriage Sidings
To the Southwest: Bedminster Down Road
History
Opened on the 29th August 1927 as Parson Street Platform. The station was rebuilt as part of a project to quadruple the lines west from Temple Meads and reopened on 21st May 1933. The suffix 'Platform' was dropped at the same time. The station buildings were demolished in January 1971.
Track Plans
-
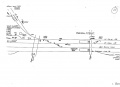 A track plan of Parson Street and surrounding area from 1988.

2004
-
The view from Parson Street road bridge towards the footbridge at Malago Vale. The new-build houses on the site of the old carriage sidings are protected from noise from the railway by a big wall.
-
A general view along the station.
-
Under the road bridge.
-
The view from the down platform with 150261 disappearing under Bartletts Bridge.
-
This electrical cabinet is underneath the stairway on the up platform.
-
The footbridge has seen better times. Like a lot of the bridges in Bristol it once had a roof.
-
This signal protects the junction between the loop and the mainline.
-
Looking along the up slow/freight line. This line leads to the Portishead Branch.
-
And looking along the scar of the down slow.
-
This electrical cabinet stands in the trackbed of the down slow.
-
A view of one of the platform shelters.
-
The other platform shelter is a different (older) design.
-
The platform ends are fenced off part way along.
-
A view of the bridge that carries Bedminster Down Road across the line. On the right is an abutment from another bridge that used to cross here.
-
A close up of the abutment.
-
A view back along the platforms, looking towards Bristol.
-
The view back along the station from the down platform.