Nibley Lane (2): Difference between revisions
Jump to navigation
Jump to search
New page: '''To Mangotsfield''': Westerleigh Viaduct <br>'''To Yate''':Yate South Junction == Gallery == <gallery> Image:Beech Hill1.jpg|The view towards Bristol. Westerleigh Viaduct is... |
|||
| (3 intermediate revisions by the same user not shown) | |||
| Line 1: | Line 1: | ||
<div style="float:right"> | |||
<googlemap lat="51.531601" lon="-2.436991"> | |||
51.530853, -2.437634, Nibley Lane | |||
</googlemap> | |||
</div> | |||
'''To Mangotsfield''': [[Westerleigh Viaduct]] | '''To Mangotsfield''': [[Westerleigh Viaduct]] | ||
<br>'''To Yate''':[[Yate South Junction]] | <br>'''To Yate''':[[Yate South Junction]] | ||
| Line 7: | Line 13: | ||
Image:Beech Hill2.jpg|The bridge across the railway. | Image:Beech Hill2.jpg|The bridge across the railway. | ||
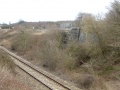
Image:Beech Hill3.jpg|The view towards [[Yate]]. The junction with the mainline is just about visible in this picture. At one time a flyover line crossed this spot taking north-bound traffic from the [[w:Great Western Railway|GWR]] line to the [[w:London, Midland and Scottish Railway|LMS]] one. | Image:Beech Hill3.jpg|The view towards [[Yate]]. The junction with the mainline is just about visible in this picture. At one time a flyover line crossed this spot taking north-bound traffic from the [[w:Great Western Railway|GWR]] line to the [[w:London, Midland and Scottish Railway|LMS]] one. | ||
Image:Beech Hill8.jpg| | Image:Beech Hill8.jpg|'''4956''' on the flyover. The abutment where the line crosses the Midland main line is visible behind the engine. The spot where Gerald was standing is now under a warehouse. ''© [[:Category:Gerald Peacock|Gerald Peacock]]'' | ||
Image:Beech Hill4.jpg|The digital zoom pushed to its limit with the corresponding drop in quality. Worth including though I think. The junction with the mainline. The opposite view is available on the Yate Station page. | Image:Beech Hill4.jpg|The digital zoom pushed to its limit with the corresponding drop in quality. Worth including though I think. The junction with the mainline. The opposite view is available on the Yate Station page. | ||
Image:Beech Hill5.jpg|The abutments for the flyover line are still visible in amongst the undergrowth. | Image:Beech Hill5.jpg|The abutments for the flyover line are still visible in amongst the undergrowth. | ||
Latest revision as of 11:38, 1 December 2007
<googlemap lat="51.531601" lon="-2.436991"> 51.530853, -2.437634, Nibley Lane </googlemap>
To Mangotsfield: Westerleigh Viaduct
To Yate:Yate South Junction
Gallery
-
 The view towards Bristol. Westerleigh Viaduct is just around the bend.
 -
 The bridge across the railway.
 -

-
 4956 on the flyover. The abutment where the line crosses the Midland main line is visible behind the engine. The spot where Gerald was standing is now under a warehouse. © Gerald Peacock
 -
 The digital zoom pushed to its limit with the corresponding drop in quality. Worth including though I think. The junction with the mainline. The opposite view is available on the Yate Station page.
 -
 The abutments for the flyover line are still visible in amongst the undergrowth.
 -
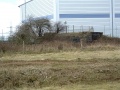 The second abutment shows that the rest of this line is buried under the warehouse mentioned in the caption above.
 -
 A footpath leads from Beech Hill to Westerleigh Common and would have at one time gone under the flyover line.


