Rhubarb Loop: Difference between revisions
Jump to navigation
Jump to search
| (2 intermediate revisions by the same user not shown) | |||
| Line 13: | Line 13: | ||
Image:Dr Days Junction7.jpg|Looking back at the bridge across [[Dr Days Junction]] with the Rhubarb Loop on the right. | Image:Dr Days Junction7.jpg|Looking back at the bridge across [[Dr Days Junction]] with the Rhubarb Loop on the right. | ||
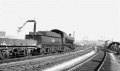
Image:Dr Days Junction1.jpg|A similar view of the bridge taken by [[:Category:Gerald Peacock|Gerald Peacock]]. '''3806''' takes the Rhubarb loop sometime in the late 50s/early 60s. ''© [[:Category:Gerald Peacock|Gerald Peacock]]'' | Image:Dr Days Junction1.jpg|A similar view of the bridge taken by [[:Category:Gerald Peacock|Gerald Peacock]]. '''3806''' takes the Rhubarb loop sometime in the late 50s/early 60s. ''© [[:Category:Gerald Peacock|Gerald Peacock]]'' | ||
Image:58011-2.jpg|[[:Category:Chris Hopkins|Chris Hopkins]] caught [[58011]] stopped at [[Dr Days Junction]] with the [[Bristol City Council Refuse Transfer Station|Barrow Rd]] portion of the ACC Binliner. 9/5/96. ''© [[:Category:Chris Hopkins|Chris Hopkins]]'' | |||
Image:58011-2.jpg|[[:Category:Chris Hopkins|Chris Hopkins]] caught [[58011]] stopped at | Image:Rhubarb Loop6.jpg|Half way around the Rhubarb the railway crosses Queen Ann Road. | ||
Image:Rhubarb Loop6.jpg|Queen Ann Road | Image:Rhubarb Loop7.jpg|The bridge viewed from the other side. In the distance is the goods depot and the railway bridge featured [[Queen Ann Road|on this page]]. | ||
Image:Rhubarb Loop7.jpg|The bridge viewed from the other side. In the distance is the goods depot and the railway bridge featured [[Queen | |||
Image:Rhubarb Loop8.jpg|The bridge is a replacement for one that used to be twice as wide. | Image:Rhubarb Loop8.jpg|The bridge is a replacement for one that used to be twice as wide. | ||
Image: | Image:Rhubarb Loop4.jpg|The same train as seen in [[:Category:Gerald Peacock|Gerald Peacock's]] photos above is seen approaching [[North Somerset Junction & Feeder Junction|North Somerset Junction]]. ''© [[:Category:Gerald Peacock|Gerald Peacock]]'' | ||
Image:Rhubarbloop2.jpg|It stops just before the signal and takes on water before continuing its journey. ''© [[:Category:Gerald Peacock|Gerald Peacock]]'' | |||
</gallery> | </gallery> | ||
[[Category:Bridges]] | [[Category:Bridges]] | ||
Latest revision as of 23:50, 8 January 2008
<googlemap lat="51.453205" lon="-2.566252"> 51.452175, -2.567239, Rhubarb Loop </googlemap>
To the North or Wales: Dr Days Junction
To Bath:Feeder Road
History
The Rhubarb Loop is named after the nearby Rhubarb Tavern on Queen Ann Road.
Gallery
-
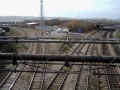 The Dr Days Junction end of The Rhubarb Loop, seen here curving left.
 -
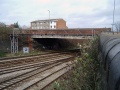 Looking back at the bridge across Dr Days Junction with the Rhubarb Loop on the right.
 -
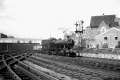 A similar view of the bridge taken by Gerald Peacock. 3806 takes the Rhubarb loop sometime in the late 50s/early 60s. © Gerald Peacock
 -
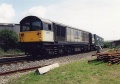 Chris Hopkins caught 58011 stopped at Dr Days Junction with the Barrow Rd portion of the ACC Binliner. 9/5/96. © Chris Hopkins
 -
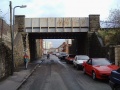 Half way around the Rhubarb the railway crosses Queen Ann Road.
 -
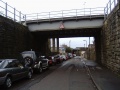 The bridge viewed from the other side. In the distance is the goods depot and the railway bridge featured on this page.
 -
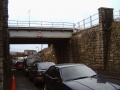 The bridge is a replacement for one that used to be twice as wide.
 -
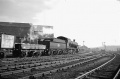 The same train as seen in Gerald Peacock's photos above is seen approaching North Somerset Junction. © Gerald Peacock
 -
 It stops just before the signal and takes on water before continuing its journey. © Gerald Peacock


